
All employees who work at heights need to understand fall arrest force.
- An employee’s fall protection needs to compensate for maximum arrest force.
- Every employee should know the components of their fall arrest systems.
- Workers need to know the difference between free fall distance and free fall clearance.
What is Fall Arrest Force?
As you become more familiar with wearing fall protection, you may notice that there is a maximum fall arrest force. A maximum arrest force, commonly shortened to MAF, is the peak amount of force that is exerted on the human body as it falls. The greater the force the more likely it is that the person falling will be injured. OSHA set the maximum arrest force for fall protection at 1,800 pounds to protect workers from severe injury or death as their equipment stops their fall.
How To Calculate Fall Arrest Forces
It stands to reason that if there is a maximum arrest force, then there is a minimum arrest force or some sort of range. While there is no set minimum arresting force, it’s best to follow this rule of thumb: the lower the arresting force is, the smaller the chances of getting injured in a fall.
It is, however, accurate to assume there is a range to arresting forces. That is because the actual arresting force you may experience during a fall is determined by four factors: your weight including any tools you may have, free fall distance, the length of your lanyard, and how well your fall arrest equipment can absorb energy from your fall. Let’s explore each of these characterisitcs more in depth.
Worker Weight
It may seem trivial, but your body weight—and the weight of any tools you may have on you—will help determine if your fall arrest system will work as it should. We mentioned previously that the maximum arresting force for a personal fall arrest system is 1,800 pounds, according to OSHA’s standards. This capacity limit is based on a worker who has an average height and weight.
This means that if you have a smaller weight and build, it would take less force to stop your fall, which in turn decreases the potential for injury. That said, the opposite is also true; there is more arresting force required to stop your fall if you weigh more, which increases your chances of getting severely injured.
Free Fall Distance
You must wear fall arrest equipment that will prevent you from free falling more than 6 feet. This is to avoid major injuries in the event of a fall. With this free fall distance in mind, it’s clear why it’s so important to choose the right lanyard length, as we will discuss later. For now, however, just remember that the shorter the distance you free fall, the less force will be exerted on your body and the lower the potential for injury.
Lanyard Length and Anchor Point
As mentioned previously, your fall protection must not allow you to free fall more than 6 feet, with distances smaller than that being the most ideal. The length of your fall arrest lanyard will help with that since they are generally 6 feet or shorter anyways.
However, it’s important to remember that the location of your anchor point, the type of fall arrest system you use, and even the type of lanyard you use may alter your free fall distance. Let’s go over each in more detail.
Anchor Point Location – This ties into the type of fall arrest system you use, but the general rule of thumb is that the higher your anchor point is, then the less free fall you will experience. In turn, there will be less fall arrest force exerted on your body. That said, make sure your anchor point is not too high above you; keep enough slack in the lanyard that you can still do your job without hassle.
Fall Arrest System – Some jobs may have you use a horizontal lifeline that you can connect your lanyard to, while other tasks may only require a vertical lifeline. The difference is that a vertical lifeline is attached to an achor point on one end and the worker’s fall protection harness on the other. A horizontal lifeline, on the other hand, is a span of lifeline that is connected to an achor point at each end, and then the worker connects their lanyard to that lifeline with a connector device. If you need to connect to a horizontal lifeline, keep in mind that they have more slack than a vertical lifeline; take the time to calculate how much your free fall distance may be altered by this extra slack.
Type of Lanyard – Just as there are different types of lifelines and fall arrest systems, there are different lanyards you may use. One is the rip-stitch lanyard. As the name implies, rip-stitch lanyards come with a section that is stitched together a certain way so that it can act as a deceleration device. Basically, if you happen to fall and are using a rip-stitch lanyard, these stitches will intentionally rip to help absorb some of the energy from the fall and thus slow your fall. Just know that this type of lanyard, and those similar, are one-time-use only; if you notice that your lanyard has been used in a fall before, do not use it. Rip-stitch lanyards are not the only kind of lanyard you can use; other lanyards stretch or expand in order to slow a fall. However, the bottom line is that these lanyards may increase how far you fall, so be cautious.
Energy Absorption
We touched on the concept briefly when we went over different types of lanyards, but energy absorption makes a difference in how effectively a fall arrest system stops your fall. A lanyard that is good at absorbing energy will stop your fall and divert the arresting force away from your body. A lanyard that doesn’t absorb energy well will either divert only a small amount of arresting force away from you or none at all, increasing the risk of energy when you do stop falling.
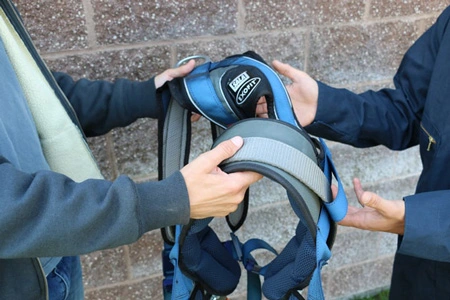
Fall Arrest Systems
What Are the Three Components of a Personal Fall Arrest System?
Personal fall arrest systems rely on many different parts and components in order to work effectively. Such components include D-rings, lanyards, anchor points, buckles, straps, and connecting devices. However, all of these parts fall under three broad component categories:
- Harnesses
- Fall Arrestors
- Anchor Points
The next sections will go over these main components in more depth.
Harness
Wearing a harness is a crucial aspect of fall protection. That is because they are structured in such a way to keep you the most secure and will prevent you from slipping out if you happen to fall; your chest, shoulders, back, and legs are all secured by the harness’s straps.
To ensure your fall arrest harness will operate as intended, make sure all buckles are connected and secured. It’s also important that you tighten the straps properly; if they are too loose, the harness may not catch you properly, but if they are too tight you risk cutting off circulation in your body and limbs.
Fall Arrestor
Fall arrestors come in many forms. Companies that do work at heights may find it useful to use a general fall arrestor such as a net to catch employees who may fall. If installing a net is impractical, personal fall arrest systems are used by personnel to keep them safe. Workers also have additional fall arrest equipment at their disposal, such as rope grabs or self-retracting lifelines.
Anchor Point
Anchor points are the points on a building or aerial lift to which an employee working at heights attaches their lanyard. These points are designed specifically to connect to fall protection equipment; do not use them for any purpose outside of that. Before you connect to an achor point and begin your work, inspect the anchor point for any signs of damage or wear, and double check that it’s secured properly wherever it is. That way, in case you do fall, you know that the anchor point will remain in place and will help stop your fall.
Free Fall Clearance
We’ve discussed free fall distance previously, but now let’s go over free fall clearance.
What Is the Difference Between Free Fall Distance and Clearance?
First off, as a reminder, free fall distance is the maximum distance you should ever have to free fall before your fall arrest system stops your fall. OSHA Requirements states that this free fall distance should be limited to 6 feet; anything more and there would be more arrest forces exerted on your body than would be physically safe. Naturally, if you experience less arrest force in a fall, you have a lower potential to be injured.
Free fall clearance, however, is the distance needed to ensure a falling person doesn’t hit the ground or a lower work level. This is often referred to as “total fall distance.” To help make the difference between free fall distance and clearance more clear, imagine that a construction worker is helping build a building. The spacing between each floor of this building is 7 feet and this worker finds himself working on the 5th floor. He’s wearing his fall protection as he should and is attached to an achor point at his feet, but something happens and he ends up falling. The construction worker wore a 5-foot rip-stitching lanyard that expands a foot from the force of his fall. The construction worker fell to the 4th floor, but only received minor injuries.
In this scenario, the construction worker’s lanyard caught him so he only fell a total of 6 feet, which was the maximum free fall distance set by OSHA. But his total fall distance didn’t give him enough clearance to avoid hitting the lower floor of the building.
Fall Clearance Formula
Now that we’ve established what fall clearance is, let’s go over how you calculate it. There are several factors you need to consider when you calculate fall clearance, or your total fall distance. Luckily, there is an easy formula to follow that will help you determine your fall clearance:
Total fall distance = lanyard length + deceleration distance + worker’s height + safety factor
Let’s break these down further.
Lanyard Length
We’ve mentioned how the length of your lanyard can affect free fall distance in the event of a fall. This is true for fall clearance as well. In fact, lanyard length can make all the difference in determining if you have enough fall clearance or not; the longer your lanyard, the more fall clearance you will need to factor in when working at heights.
Deceleration Distance
This is another way of saying arrest distance and is a part of the free fall distance. Deceleration distance is the the distance it actually takes for a fall arrestor to slow your fall by absorbing energy. OSHA states that this distance be no greater than 3.5 feet.
Worker’s Height
A worker’s height may seem like a trivial matter, but it does make a difference when calculating fall clearance. No two workers will have the same fall clearance because no two workers are exactly the same height.
Safety Factor
Even if you do all of your calculations correctly, it’s always better to be safe than sorry. The safety factor is a way to ensure this; just add 2 or 3 feet to your calculated clearance to compensate for any kind of error.
Other Considerations
In addition to the factors we’ve already established, you need to consider harness stretch and the location of your anchor point. Harness stretch can be grouped under your safety factor calculation. On the other hand, how your anchor point affects your fall clearance depends entirely on location. For example, if your anchor point is at your feet, you will need more fall clearance than if your anchor point is attached overhead.
Safety Training
Fall protection is not something to take lightly. All employees, regardless of experience, need to be trained to use fall protection properly and need to know how to factor in fall arrest force and clearance while they work at heights. An average of 370 workers die each year from falls; receiving proper training can help prevent these fatalities.
The Hard Hat Training series offers a reliable, OSHA Aligned Fall Protection Online Training Course to provide a comprehensive guide on how to use fall protection correctly and safely.